 |
 |
 |
 |
 |
 |
 |
|
|
|
|
|
|
|
Designing And building project 160 was a task that required specialist knowledge, for this I called upon the help of Bob (car audio god) Hobson from Prestige car audio in Rickmansworth, Prestige are known for building some of the best demo cars in the country and have worked on many celebrity and magazine feature cars. The basic plan from the start was to build a
sound system that was capable of delivering some serious SPL as well
as having a good quality front end set up. Working out how to fit all that audio equipment into the van was left to me, after many hours of head scratching a design was settled on, this included a hexagonal tunnel for the subs and some kind of fancy amp rack to hold all the amplifiers would be needed as the space that was left in the back of the van was quite small. Using a hexagonal tunnel meant I would have to buy two more subs as it would need eighteen in total to fill it and this also meant I would need an extra amplifier to run the extra subs, however there was no way to arrange 11 amplifiers and make it look good so I ended up buying two amplifiers so I could make an amp rack that was symmetrical, there is now an extra amplifier in the van that is not used within the sound system however it is actually wired to run a pair of external PA speakers mounted on stands when it is on display at shows. As the project went on I came across many obstacles
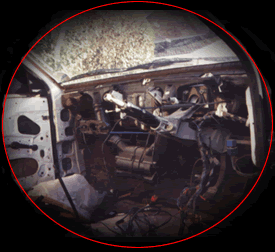
that I tackled one at a time, one of the biggest was defiantly the dash,
after spending a few days on the original one I decided to scrap it
and build one from scratch, this idea at the time had only been done
once in the UK and was quite unusual although now it is fairly common
to see dash boards made from scratch, the main reason I chose to make
one was that after I had finished cutting the original one around to
fit all the new equipment it had become fairly weak and was also starting
to look a bit of a mess, building my own dash made lots of possibilities
become reality, for example I have been able to place the horns and
other items just where I want them, and install a digital instrument
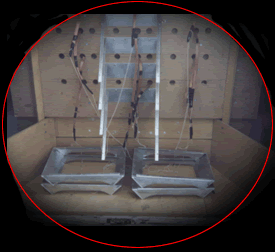
cluster. My local precision metal fabricators were set the task of making various items for the project including a 3ft square steel box that was attached to the bottom of the van and now holds all the batteries, all the stainless steel switch panels on the dash, the amp rack which I designed using a cornflake box was soon a reality, they louvered the metal panels which were to replace the windows in the rear doors, the 2”x ¾” copper bus bars to connect the batteries were supplied by them and also made the stainless steel screw cap mounted on the side of the van which allows the podium to be connected to the van with all the doors shut. Around twenty 8ft x 4ft sheets of MDF in various
thicknesses were used during the construction and most of these were
used on the bass box. Wiring was another major part of the sound system,
a lot of people don’t realize how important the wiring is, a power
cable that is not large enough to cope with the power being drawn will
at best not deliver enough voltage and restrict the amplifiers performance
and at worst could over heat and catch fire!! When I brought the van it had been lowered by the previous owner which I thought would save me a job, but it wasn’t long before the weight of the sound system had the back of the van sitting on the bump stops, so it was back down to my ford dealer to buy the strongest leaf springs available, the new springs are able to deal with a 1 1/2 tonne load and are a great improvement. The exhaust is a one of custom powerflow system as the original one had to be removed because it would not clear the battery box. Both the front seats and door cards have been re-trimmed in black leather and turquoise alcantera with excellent results. The last area of the van to be sorted was the engine bay, initially I wasn’t going to bother but I am good friends with Bailey Motorsport and it would be rude not to sort it, all the hoses have been replaced with Samco’s finest silicone, all the products that Bailey Motorsport do for this engine can be found on ‘project 160’ and many of the other parts have been highly polished or chrome plated to match the Bailey products. With any project car knowing when to stop is
impossible, with so many products available you are limited only by
your imagination and the size of your wallet.
|
 |
 |
 |