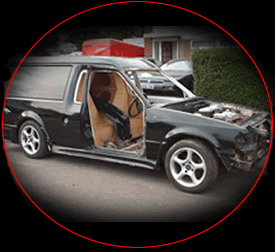
When the van was brought it had already
been modified on the outside with alloy wheels, side skirts and bumpers
just leaving me to do the inside, but as time has gone by it has been
necessary to carry out further modifications to the exterior.
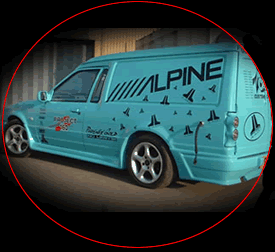
The most noticeable change is the complete respray and change of color
from black to turquoise; my last project car was the same color and
attracted a lot of attention and several magazine features because of
its bright color.
The glass windows in the rear doors have been removed on metal plates
welded in their place, this was to improve security as there is several
thousand pounds worth audio equipment on the other side but it has also
enabled me to have the louvers pressed into the plates so I can install
cooling fans on the inside to draw out some of the hot air generated
by the amplifiers and prevent any unnecessary over heating.
On the passenger side near the back of the van a stainless steel screw
cap has been installed, this is so I can feed wires into the van without
opening the rear doors, this will be necessary in competition when the
podium has to be connected to operate the sound system.
Removable clamps have been fitted to both of the front doors to hold
them shut during competition and also removable window bars for the
window screen can be fitted for competition use.
The last exterior modification are the rear lights which are one off
items designed and made by myself, they were made because none of the
aftermarket companies make any thing for this type of vehicle and the
standard one looked rubbish and
ruined the back of the van.
The new lights consist of four light units each one having a ring of
LED’s with a light in the middle, by using two lights each side
I have been able to wire them up so all four LED rings come on as side
lights, the light in the middle of the top light unit has an orange
bulb and works as the indicators, the light in the middle of the bottom
light unit has a red bulb and works as the brake lights.
THE DASH BOARD
The dashboard caused many problems,
originally the standard escort dash was modified to accept the horns,
tweeters and motorised screen, but was scraped at an early stage and
a completely new one was made from scratch.
This has many advantages, with MDF and fibre glass construction it is
actually stronger than the standard plastic one and gives a much better
base for mounting things such as the horns, motorised screen etc.
I have been able to get rid of unnecessary things like the air vents
and make way for more important things such as the screen and DVD player,
and also mount them in just the right places.
I have been able to customise it to give it a one of a kind look, this
has included removing the indicator stalks in favour of a switch panel
to operate the lights etc, rally car style push button engine start
and a digital instrument panel taken from an astra GTE.
Finally it has been painted to match the exterior paintwork and now
looks as if it is made from plastic.
MATERIALS USED
Various materials were used to construct this vehicle, some in large
quantities.
1) 20 rolls of Original Dynamat
Installed to every panel of the van
2) 30 meters of medium weight glass
fiber mat and 50 liters of resin.
Used extensively in the cabin area on all panels including roof, floor
and bulkhead. The main baffle board has also been glass fibred to give
additional strength and keep front and rear compartments air tight from
each other.
3) Over 3000 3" screws with more
than 1500 holding the sub enclosure and surrounding parts together.
4) 40 tubes of grip fill used to glue
all wooden parts.
5) 15 sheets of 8' by 4' MDF in three
thicknesses: 12mm, 18mm, and 25mm.
6) 15 meters of black vinyl and 20
cans of spray glue used to trim the whole installation.
|